Zendo 4.0 release notes (Copy)
Product update

Zendo 4.0: make it yours, down to the last detail

Kuba, founder of ZendoRelease: Monday, November 9, 2026

Zendo 4.0 is the biggest update we have shipped since Zendo launched. It lands on Monday, November 9, and it does two things at once. It lets you shape Zendo around the way your business actually looks and works. The tickets your support team answers and the projects your team delivers no longer share one long list called Requests. And it gives you more control over how your client portal looks than any client portal we know of, from 240 ready-made themes to a different look for every client.

Under the hood, 4.0 is a new app. We rewrote Zendo from scratch on a new version of Vue.js, so every page opens faster and the app is much more stable. You will notice it from the first click. On top of that, 4.0 links every Order to the work it pays for, shows you what will happen before you press Send, and tidies up names and settings that had grown in too many directions.

It also works on your phone. Finally Zendo 4.0 has a mobile app. It is a progressive web app (PWA), so the whole Zendo, for your team and for your clients, can sit on the home screen and work like a native app. And Settings got a complete overhaul, with a new screen of its own.

Release window

We will release Zendo 4.0 on Monday, November 9, between 6:00 and 12:00 CET (5:00–11:00 UTC, midnight–6:00 am ET). At some point during that window Zendo may be unavailable for a while, for your team and for your clients, so if you expect clients to be active that morning, let them know in advance. Your data moves over on its own, and your clients don't need to do anything.

Call your work whatever you call it

Every business has its own words for its work. One team runs projects, another answers tickets, books sessions, handles cases or manages listings. Until now Zendo called all of them Requests, and that word followed your team and your clients everywhere.

In 4.0 you decide what your workspace runs on. Name each kind of work the way your business does, whether that is Projects, Tickets, Sessions, Cases, Listings, Shoots or anything else, and assign your Request types to it. Zendo then uses your words wherever that work shows up: in the page header, on the button that creates one, and in the preview of what happens when a client submits it. Your team opens a Project, your client sends a Ticket, and nobody has to translate. Each kind of work keeps everything a Request type already had, from its own form to its own Statuses and Services, and, as the next section shows, it can get its own tab and board.
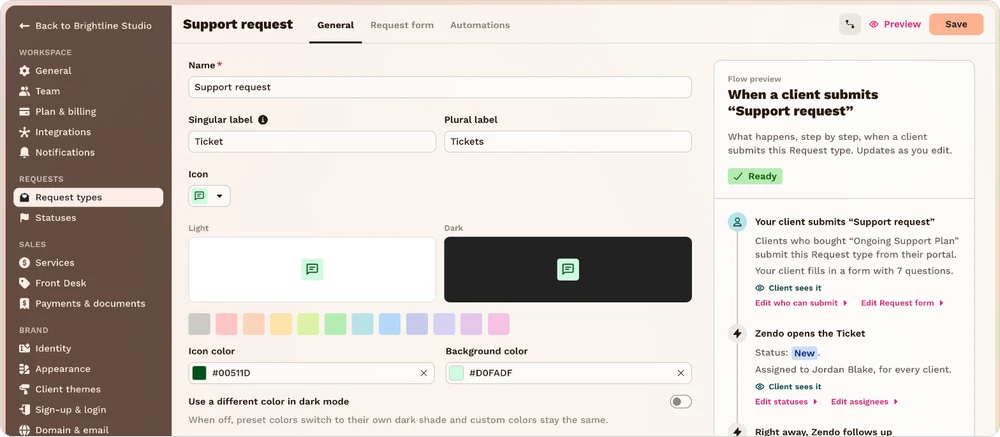
Support request type set up as Tickets, with the Flow preview on the right saying Zendo opens the Ticket
Settings › Requests › Request types. Your team and clients know this Support request as a Ticket, and the Flow preview on the right already uses that name. Theme: Coral Sunrise, Gradient.

Give every kind of work its own tab

Names are only half of it. The bigger change is where the work lives. With Request tabs you add your own entries to the sidebar, each showing only the Request types you choose. You can have a Projects tab for client work and a Tickets tab for support, side by side, each with its own counter of unread Requests.

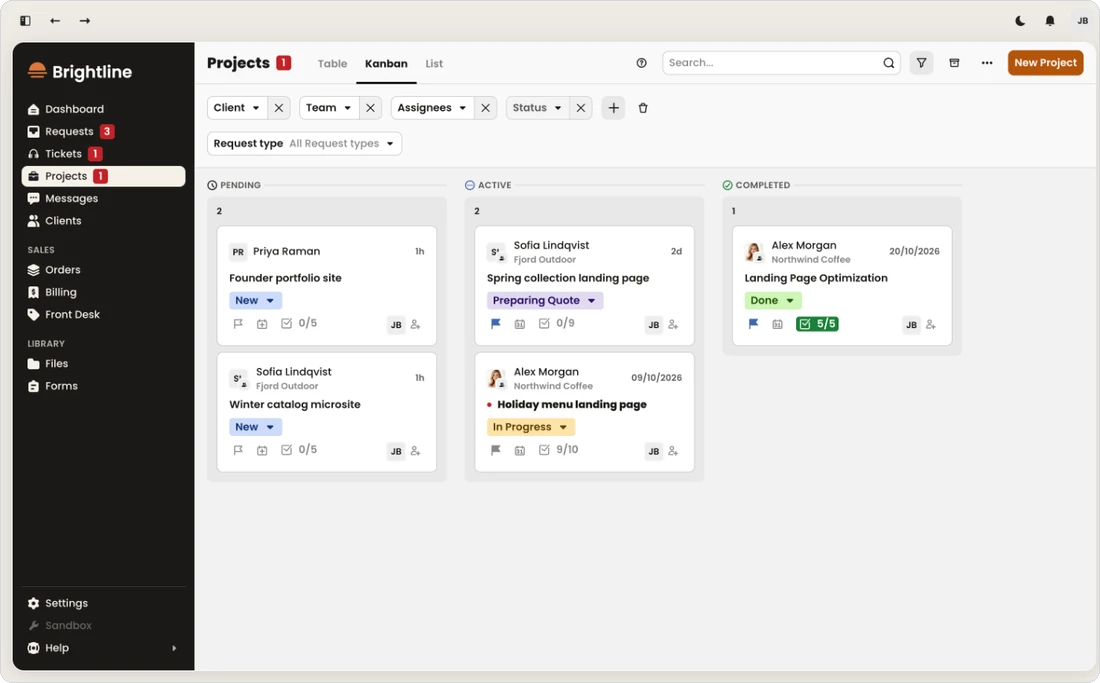
Zendo 4.0 with Tickets and Projects tabs in the sidebar and the Projects tab open as a Kanban board
The team sidebar with two new Request tabs, Tickets and Projects, below the usual Requests. The Projects tab is open: it shows only project work and lands straight on a Kanban board, where two different Request types, custom projects and fixed-scope projects, sit side by side in the Pending, Active and Completed columns. Theme: Carbon Amber, Solid.

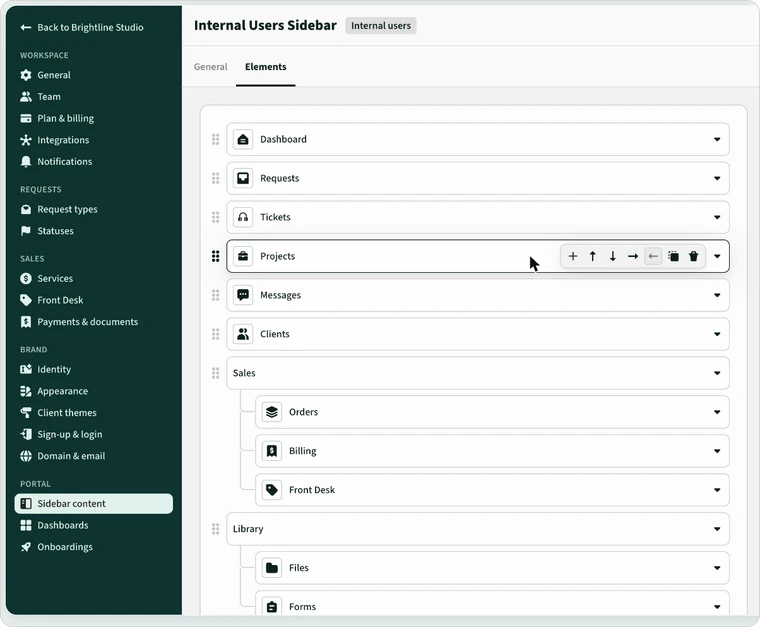
A Request tab is a sidebar element. You can create as many Request tabs as you like and configure each one differently.

Sidebar content editor for the team sidebar with Tickets and Projects placed under Requests
Tickets and Projects sit in the sidebar like any other element. Drag them where you want them.
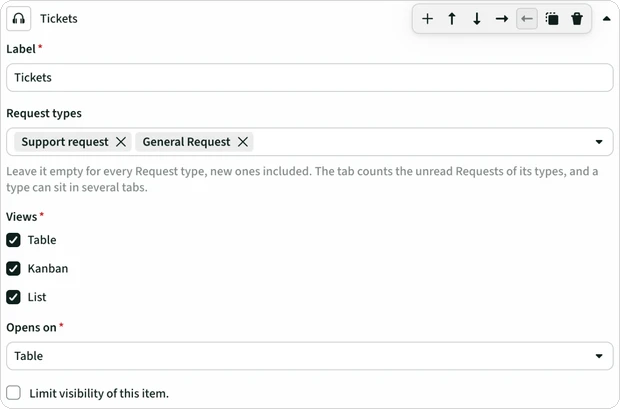
Request tab settings: label Tickets, Request types Support request and General Request, all three views, opens on Table
Tickets collects two Request types: Support request and General Request.
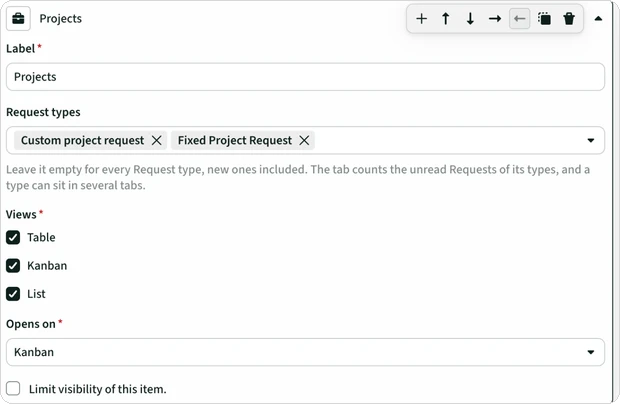
Request tab settings for Projects: Custom project request and Fixed Project Request, opens on Kanban
Projects collects two project types and opens on Kanban.

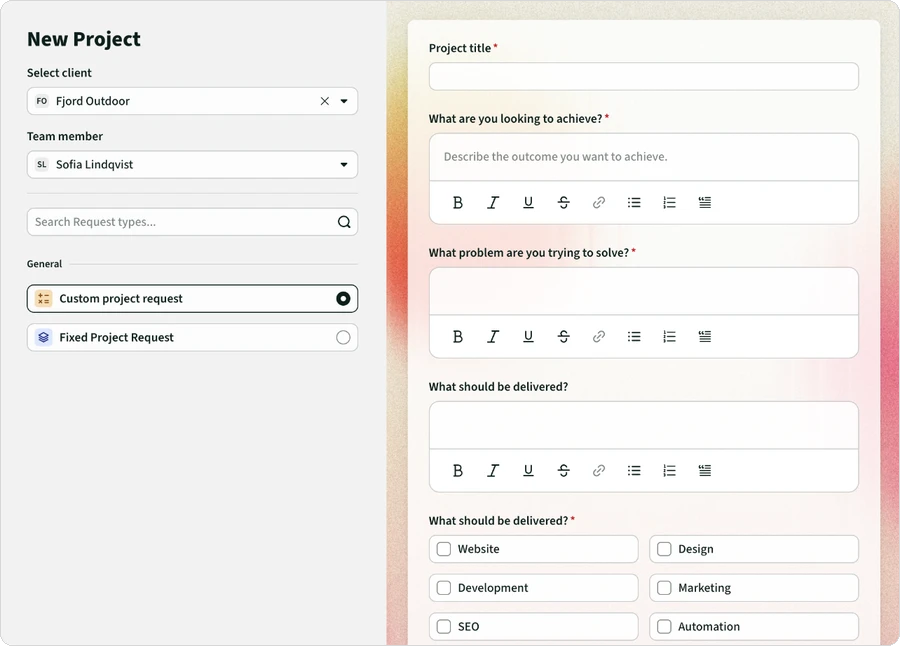
Inside a tab, everything is scoped to that tab. The header carries its name, the filters work on its Requests only, and when every type in the tab shares one label the button follows it: in Projects it reads New Project. Pick a client and Zendo offers only the Request types that belong to this tab, so nobody files a support ticket in the projects board by accident.

New Project dialog listing only Custom project request and Fixed Project Request for the selected client
New Project, opened from the Projects tab, offers only the two project types.

The Kanban board groups cards by state: Pending, Active and Completed, with each card's Status one click away. Because every Status now belongs to exactly one of those states (more on that below), a board can mix Request types that use different Statuses and still make sense. The same tab in Table view gives you priorities, deadlines, tasks and assignees at a glance.

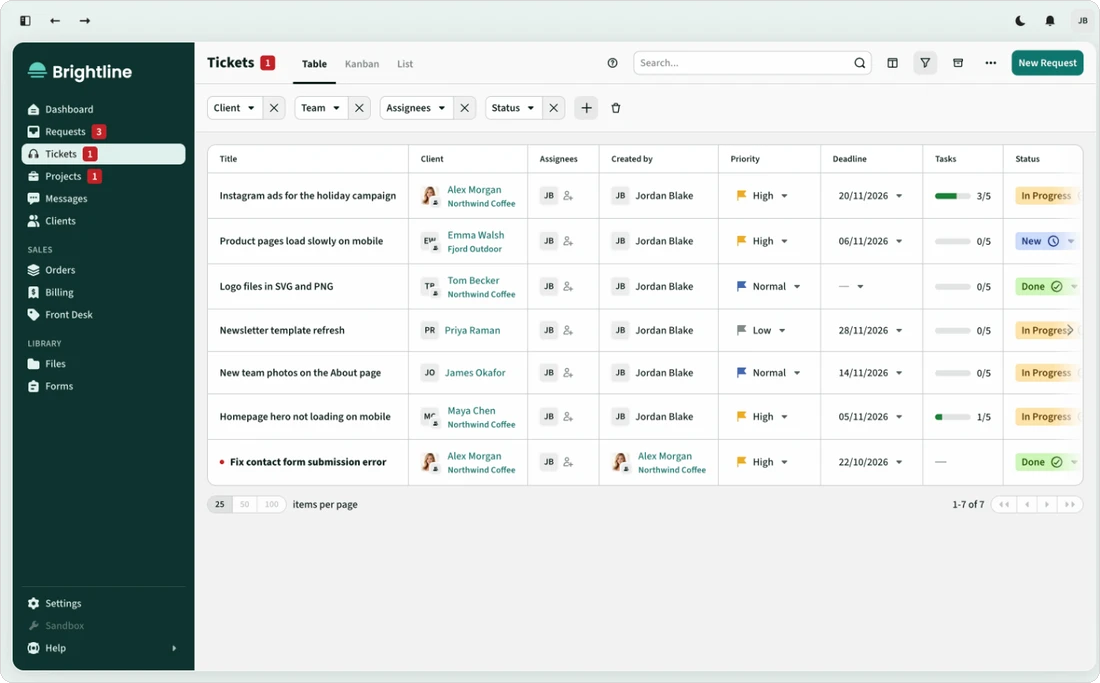
Tickets tab in Table view with Requests from different clients
The Tickets tab in Table view. Theme: Teal, Solid.
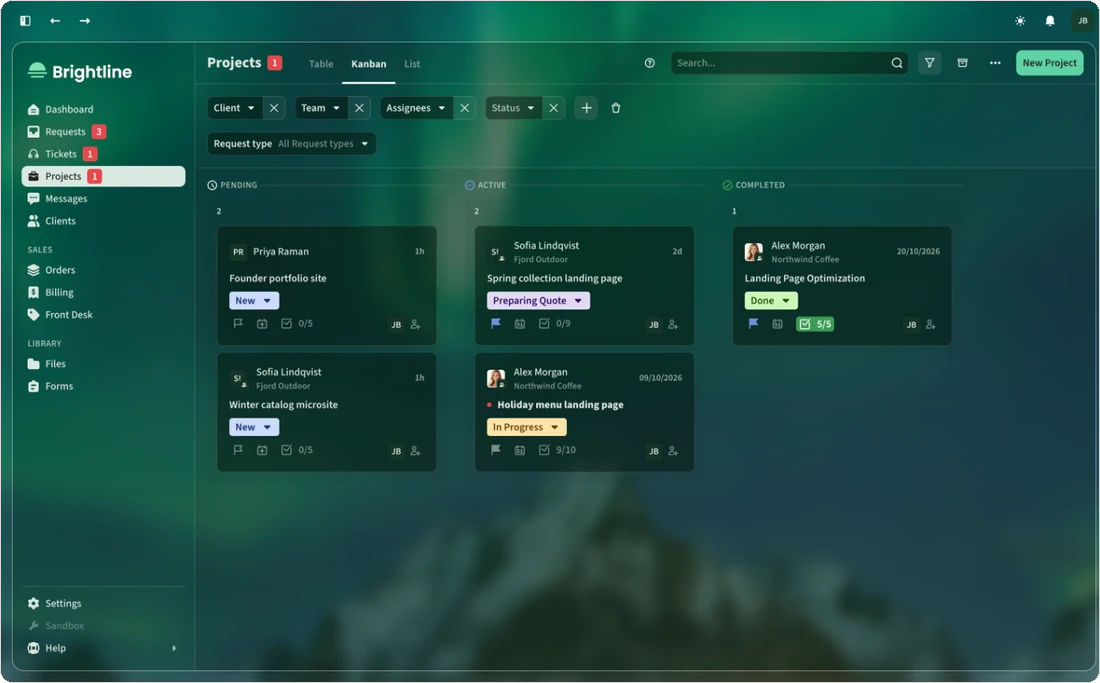
The Projects Kanban board in dark mode with an aurora photo behind it
The same board in dark mode, in the Bottle theme with a photo and gradient layered behind it. Every theme ships with a matching dark version.

Your clients get tabs too

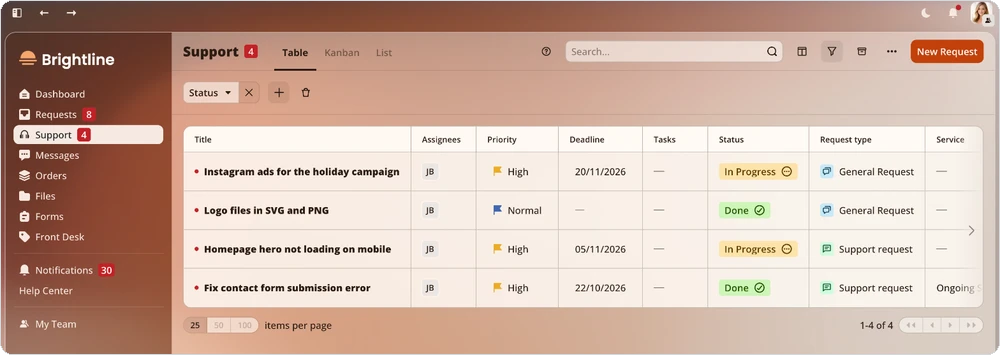
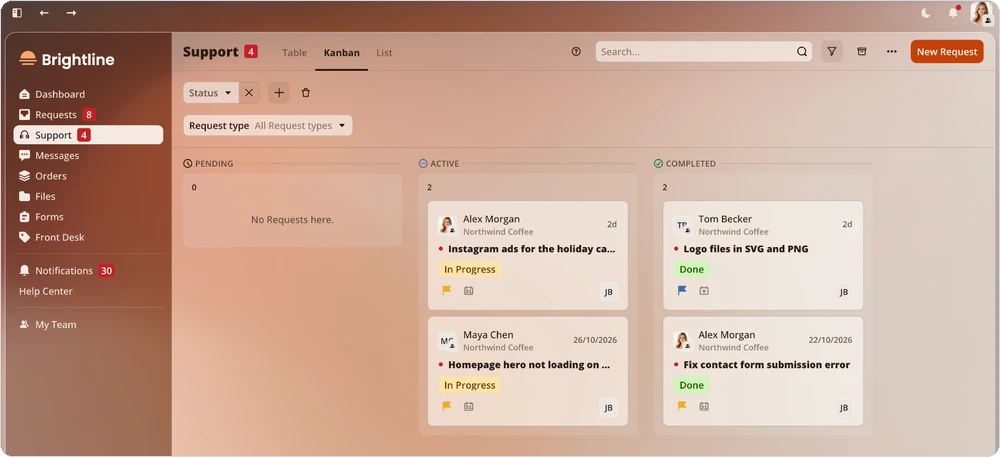
Request tabs work in client sidebars the same way. Give a retainer client a Support tab next to their Requests, and they see their tickets in a table, a list or on a board, with their own unread counter, inside the theme you picked for them.

Client view of the Support tab in Table view
Client view of the Support tab on a Kanban board
What Alex from Northwind Coffee sees: a Support tab with his tickets, as a table and as a board, in a theme made just for Northwind.

240 themes, ready on day one

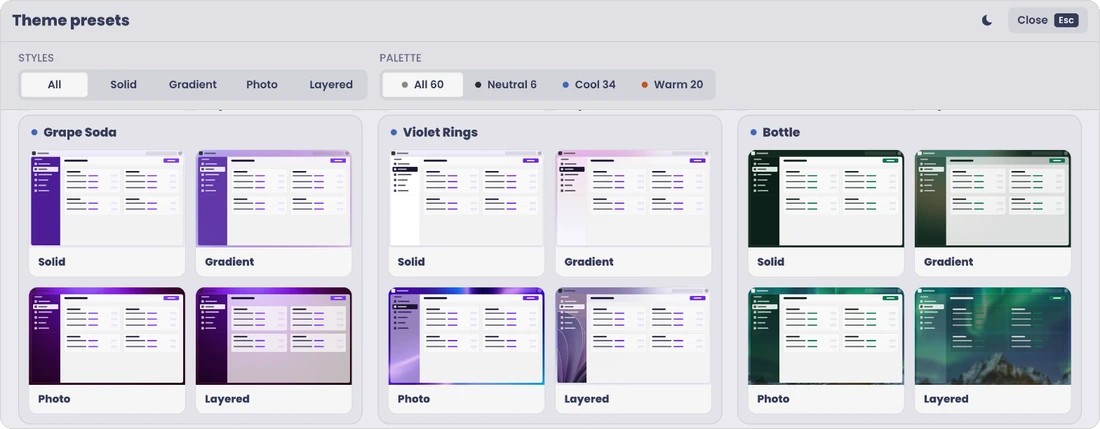
The fastest way to make the portal yours is a theme preset. Open Settings › Brand › Appearance and click Choose a theme preset. The gallery holds 60 palettes, each in four styles: Solid for plain surfaces, Gradient for color washes behind glass, Photo for a photograph in the background or the sidebar, and Layered for photo and gradient together. That makes 240 themes. Filter by style or by palette (Neutral, Cool, Warm), and flip every preview between light and dark mode before you decide.

Theme presets gallery with style and palette filters and the Grape Soda, Violet Rings and Bottle palettes in four styles
The preset gallery: filter by style and palette, and see every palette in all four styles.

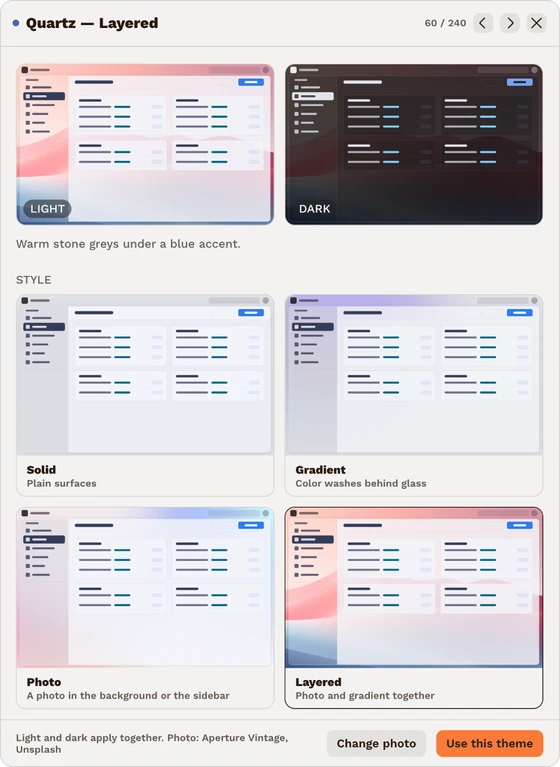
Click a preset to see it up close: light and dark side by side, all four styles of that palette. Every plan can use every preset.

Quartz preset detail with light and dark previews, four styles, Change photo and Use this theme
Quartz in the Layered style: light and dark previews, all four styles and the photo credit.

Or build your own, down to the hover state

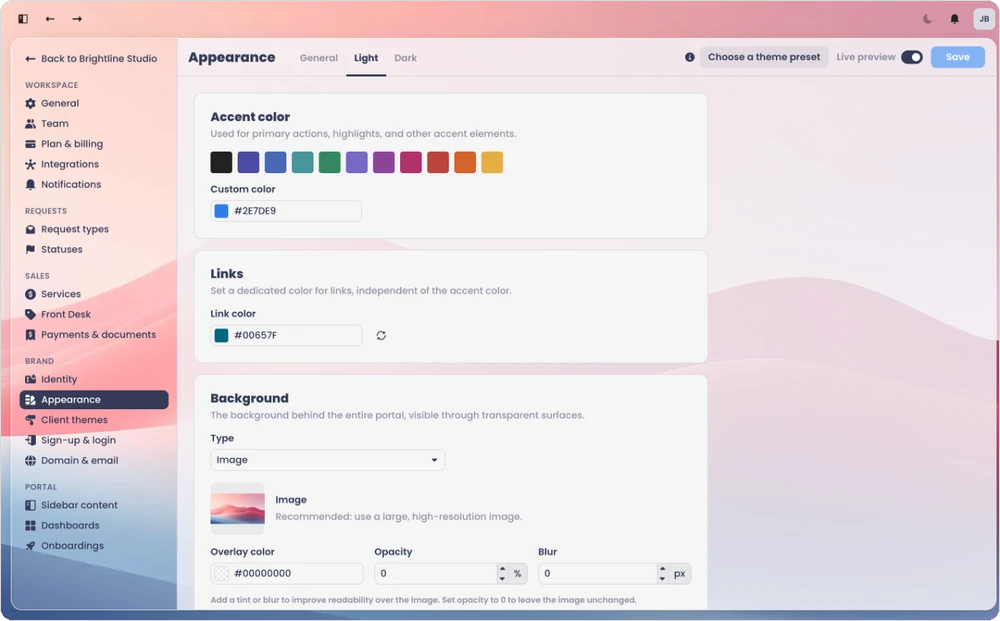
A preset is a starting point. Everything in it can be changed, and on Pro and Agency you can change all of it. Appearance has three tabs: General, Light and Dark, and a live preview that repaints the app as you edit.

Appearance settings, Light tab: accent color, link color and background image, with the Quartz theme applied
Settings › Brand › Appearance, Light tab, with Quartz applied.

Here is everything you can set, for light and dark mode separately:

  • Accent color: eleven preset swatches or any custom color, used for buttons, highlights and selection.
  • Links: a link color of its own, independent of the accent.
  • Background: solid color, gradient or image, with an optional gradient overlay.
  • Page surface: background color and opacity of the content area, text color, and advanced options.
  • Portal frame: border, width, shadow and corner radius of the frame around the app.
  • Sidebar: its own styling and background image, with separate colors for default, hover and selected items.
  • Top bar: icon and text color set automatically, matched to the sidebar, matched to the page, or custom.
  • Controls: background and text color of inputs and buttons, or inherited from the theme.
  • Dialogs and menus: background and text color, with a Preview a dialog button.
  • Contrast: Low, Default or High.
  • Dark mode: set it by hand, or let Zendo generate dark mode from light.

On the General tab you decide whether clients may switch between light and dark mode and which mode they start in, and you pick the font family and font size for the whole portal.

A different look for every client

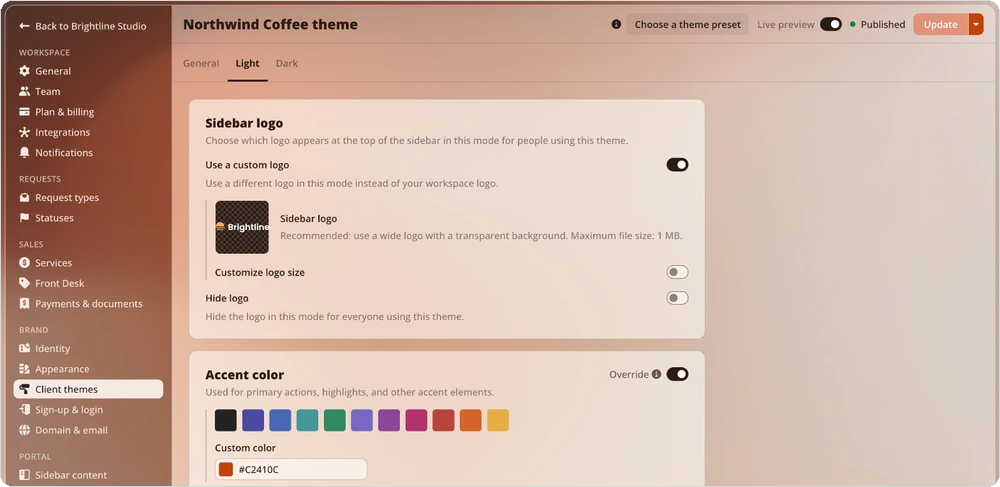
Some clients deserve their own room. Client themes (Settings › Brand › Client themes) let you give a client or a Client Team a look of its own: their colors, their font, a photo from their world. Each theme lists who it applies to, and your team keeps seeing your workspace theme.

A Client theme doesn't copy the whole workspace theme. Every section has an Override switch, and only what you switch on is stored. Change your accent color next month and every client theme that didn't override it follows automatically.

Northwind Coffee client theme, Light tab: custom sidebar logo and accent color override
The Northwind Coffee client theme uses Terracotta in the Layered style and its own sidebar logo. Only the sections with Override switched on differ from the workspace theme.

Sign-up and login that look like yours

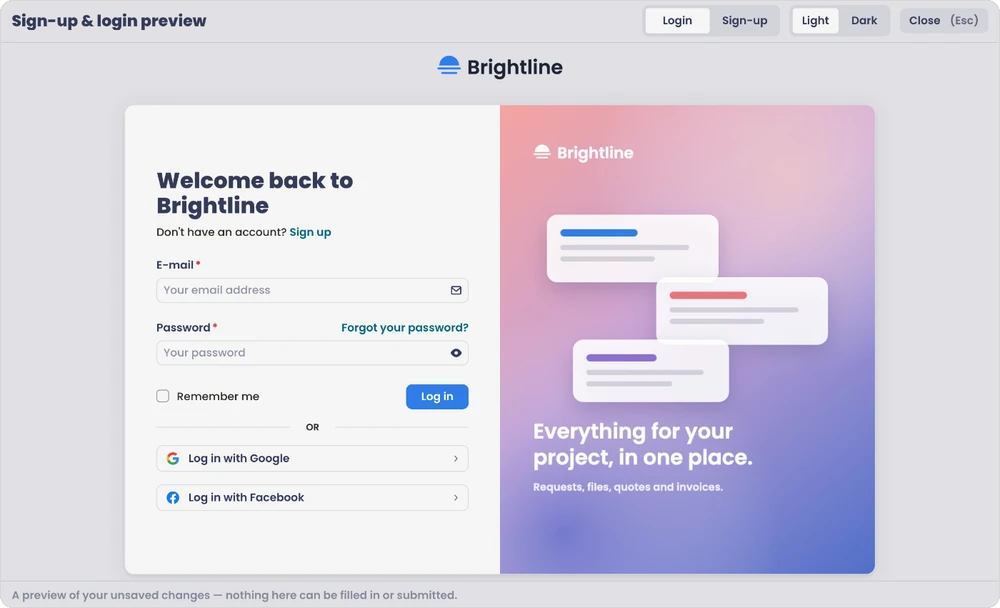
The first screen your client ever sees is now fully yours. Settings › Brand › Sign-up & login lets you use a separate logo or hide it, write your own login and sign-up headings, set the background for light and dark mode, and hide Google and Facebook login. Preview pages shows both screens, in both modes, before you save.

Sign-up and login preview: a branded login page with a custom heading and an image beside the form
The login preview, with Login / Sign-up and Light / Dark switches at the top.

Zendo on your phone

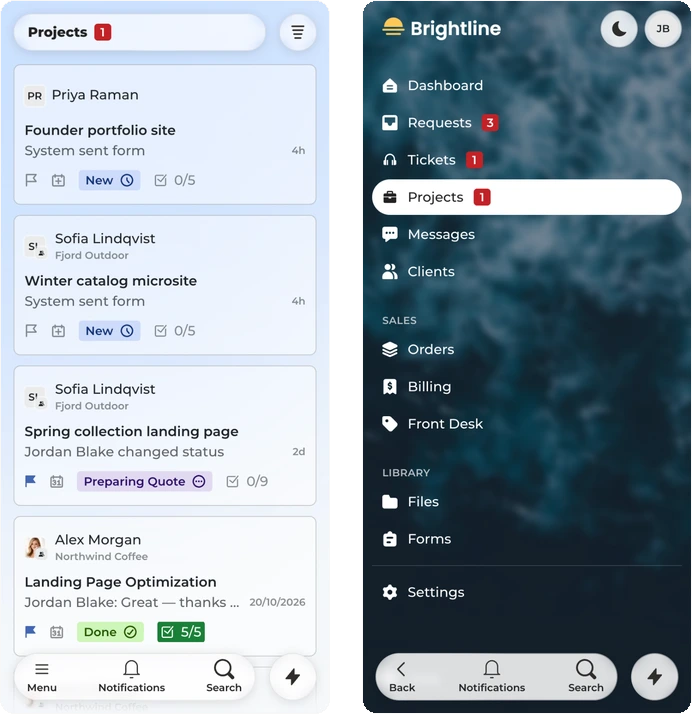
Zendo 4.0 is a progressive web app (PWA). Open your workspace on a phone, add it to the home screen, and you get the whole app, not a cut-down version: the same tabs, boards, messages and settings, with Menu, Notifications and Search at the bottom of the screen where your thumb can reach them. Your clients get the same in their portal, in the theme you picked for them.

Zendo 4.0 on a phone: the Projects tab and the open menu with Request tabs
The Projects tab and the menu on a phone. Theme: Daylight, Layered.

Dashboards and sidebars per client, team or role

What clients see inside the portal now lives in one place, Settings › Portal:

  • Sidebar content: the order, name and visibility of every module, so you can call each item whatever your clients already know it as, plus Request tabs, Apps, external links, headings, dividers and gaps. Group items under a heading and nest them. Make one sidebar for all clients, others for chosen clients or Client Teams, and separate ones for your team by role.
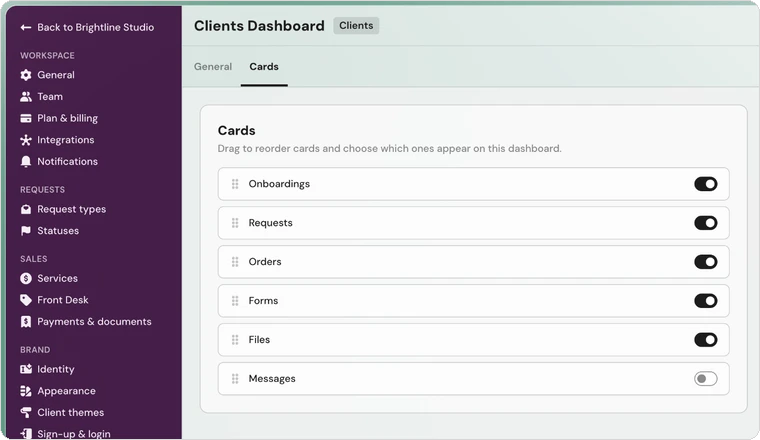
  • Dashboards: which cards appear and in what order (Onboardings, Requests, Orders, Forms, Files, Messages for clients; Quotes and Invoices too for your team), and whether the New Request and Order service buttons show, with your own labels and accent color. Custom Dashboards for chosen clients come with Pro and Agency.
  • Onboardings: now with Draft, Publish and Unpublish, and limited to chosen clients or Client Teams, not only to Services and Request types.
Clients Dashboard settings: drag to reorder cards and switch each one on or off
Settings › Portal › Dashboards, Cards tab.

See what will happen before it happens

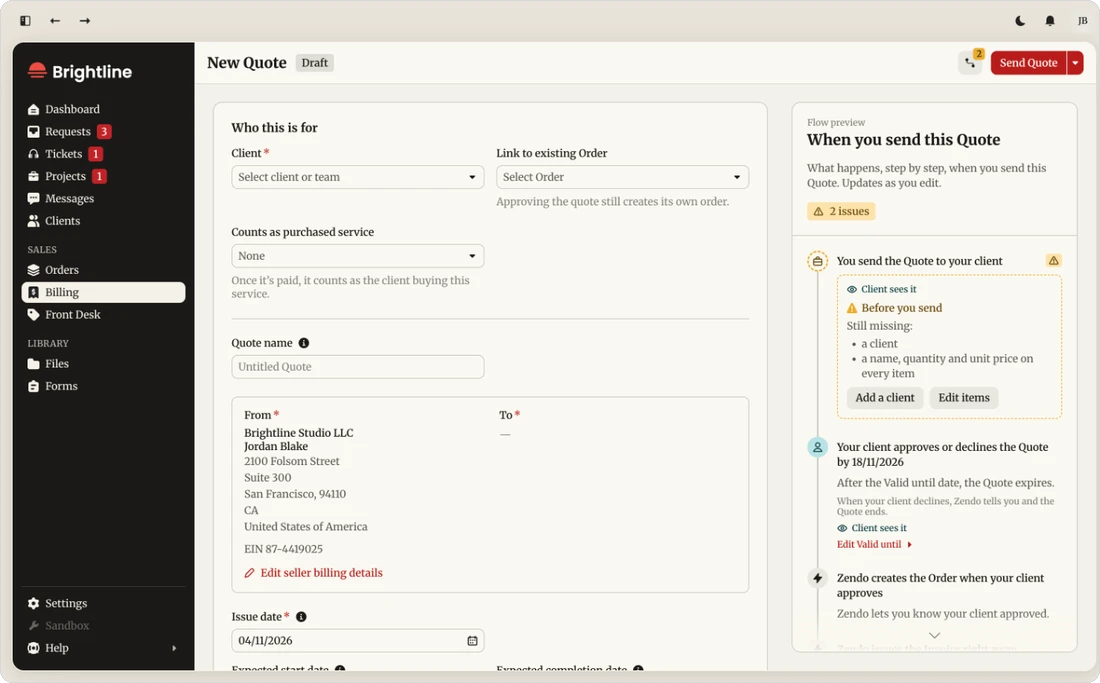
Wherever you set something up or send something to a client, Zendo now shows Flow preview: a step-by-step list of what will happen next, right beside the form, updating as you type. It is there when you add a client, edit a Service, a Request type, a form or an Onboarding, and when you write a Quote or an Invoice. Steps your client will see are marked as such, and anything missing (no client picked, an item without a price, a Service that takes payment but never opens a Request) shows up as an issue with a button that takes you to the fix.

New Quote with Flow preview listing what is missing, then the approval and Order steps
Flow preview on a new Quote: two things are missing before it can go out. Theme: Newsprint, Solid.

Requests are the work, Orders are the money

In 4.0 every Order is linked to the Requests it pays for, and you can follow the link from either side. A Request has a Billing tab and a Get paid button with two paths, Send a Quote for approval or Send an Invoice and get paid. An Order has a Requests section where you create a new Request or link an existing one.

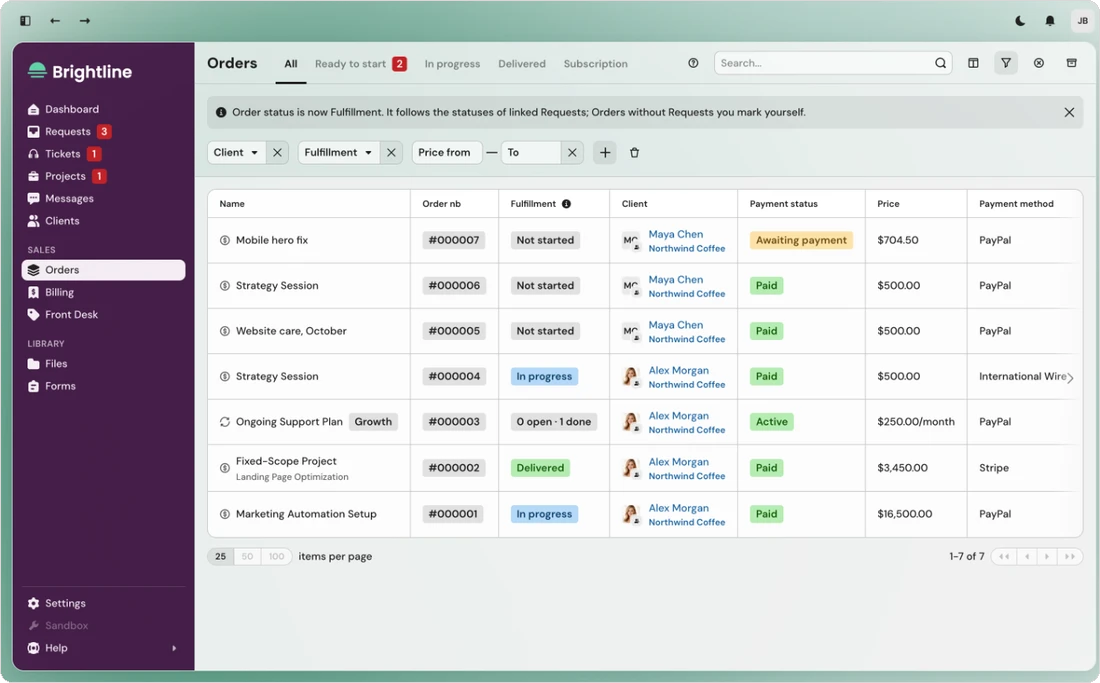
Orders now carry two separate statuses. Payment status is about the money. Fulfillment is about the work, and Zendo keeps it up to date from the linked Requests: Not started, In progress, or Delivered once every Request is completed. Subscriptions show how many Requests are open and done. The Orders list has new tabs for Ready to start (paid, work not begun), In progress, Delivered and Subscription.

Orders list with Fulfillment and Payment status columns and Ready to start, In progress, Delivered and Subscription tabs
Sales › Orders. Two Orders are paid and waiting for work to start. Theme: Jade Desk, Gradient.

The money side got the details agencies kept asking for:

  • Cancel order shows what was paid and which Requests are still open, voids unpaid Invoices and Quotes, can mark paid documents as refunded and archive open Requests. The reason stays in the Order's history; the client doesn't see it.
  • Mark as refunded records a refund on a paid document, with a date and a note the client sees on the document and in the email. Zendo doesn't move the money itself.
  • I've paid lets a client who paid by bank transfer report it with a date and a reference number. Your team gets a Payment reported notification and confirms it with one click.
  • Record payment works on every document, including ones set up for Stripe.
  • New client notifications: New order placed, Payment received, Order canceled and Refund recorded.

Smaller things you'll notice

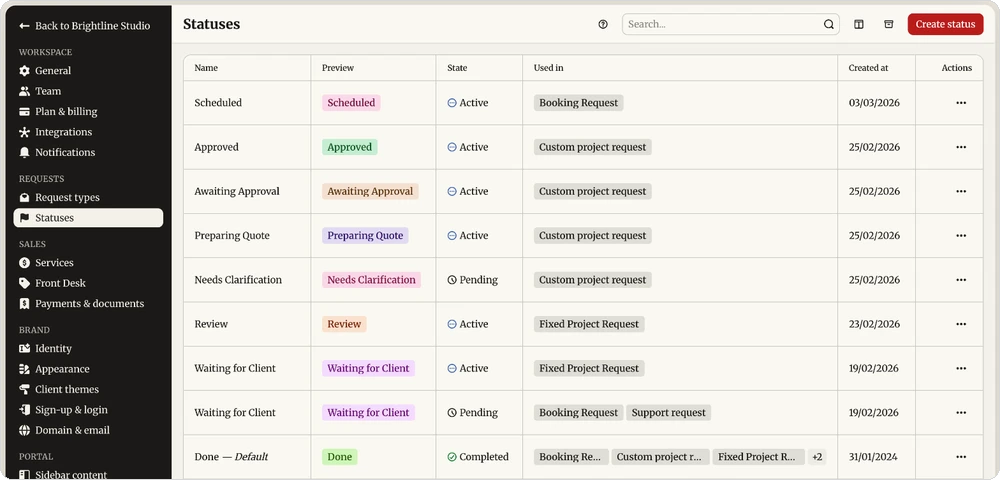
Statuses mean the same thing everywhere. Every Status now belongs to one state, Pending, Active or Completed, and the Statuses list shows the state and every Request type that uses it. That is what lets one Kanban board mix several Request types. Statuses and Request types can also have a separate color for dark mode.

Statuses list with State and Used in columns and two Statuses named Waiting for Client
Settings › Requests › Statuses. After the update there are two Statuses called Waiting for Client: one Active, one Pending.

Who can submit replaces the old public switch on a Request type: everyone, only clients who bought a Service, or only your team.

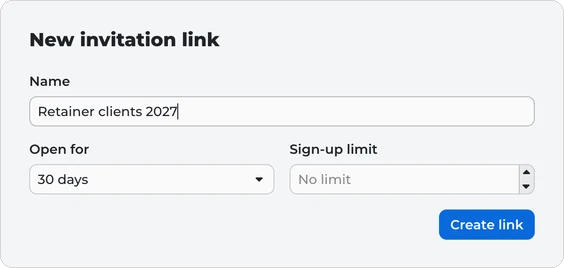
Invitation links replace invite codes. Name a link, keep it open for 1, 7 or 30 days or without limit, cap the number of sign-ups, and revoke it any time. Clients' links are under Clients › Invitation links, your team's under Settings › Team.

New invitation link dialog with Name, Open for and Sign-up limit

Delivery logs (Settings › Workspace › Notifications, for Owners) show who received each notification, who didn't, and why, for the last 30 days.

A new Settings screen

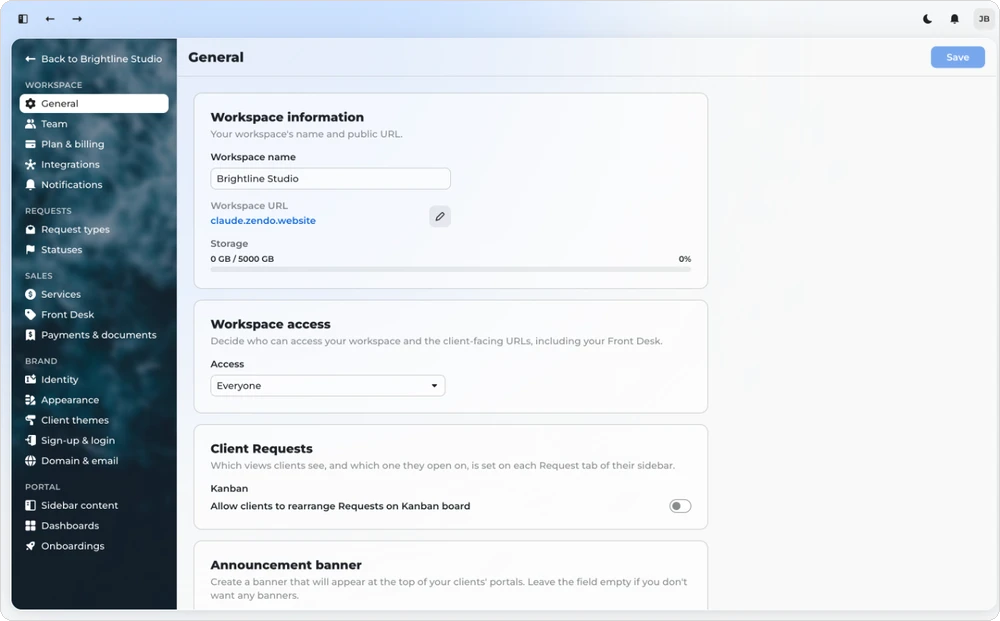
Settings got a complete overhaul. They now open as a screen of their own, with their own navigation grouped into Workspace, Requests, Sales, Brand and Portal, so everything about how Zendo works, sells and looks is one click away, and Back to your workspace takes you straight back to work. Every page follows the same layout, and wherever you change how something looks or behaves, a live preview or Flow preview shows the result before you save.

The new Settings screen with grouped navigation on the left and Workspace › General open
Settings › Workspace › General. Theme: Daylight, Layered.

Renamed and moved

BeforeIn 4.0
Storefront, Service CatalogFront Desk
ImpersonateView as client, View as member
Productized (Service type)One-off
Order status: New, In Progress, DoneFulfillment: Not started, In progress, Delivered
Payment status "New"Awaiting payment
Invoicing, in the client portalInside Orders
Public switch on a Request typeWho can submit
Portal appearance per sidebarClient themes
Invite codesInvitation links

In the main navigation, Orders, Billing and Front Desk sit under Sales, and Files and Forms under Library. Settings are grouped into Workspace, Requests, Sales, Brand and Portal. Old settings links redirect to their new place.

Already using Zendo?

What to check after the update

If you used Zendo before 4.0, your data moves over on its own. Most workspaces then need about fifteen minutes to go through the list below. Each point links to the part of this post that explains the change.

  1. Statuses you used in more than one way

    The state (Pending, Active or Completed) now belongs to the Status itself, not to each Request type. Where one Status was used in two states, the update turns it into two Statuses with the same name, and your Requests keep the name and color they had. Open Settings › Requests › Statuses, and if two Statuses share a name, check the State column and rename one of them, for example "Review" and "Review – approved".

    How Statuses work now →
  2. How your portal looks

    Settings › Brand › Appearance is now the base look: your team always sees it, and so does every client without a theme of their own. What used to be Portal appearance is now Client themes, for clients and Client Teams. Open both, check light and dark mode, and use View as client to see the portal the way a client does.

    Themes, Appearance and Client themes →
  3. Orders you track without a Request

    The old Order status (New, In Progress, Done) is replaced by Fulfillment: Not started, In progress or Delivered. Orders with linked Requests update on their own. During the update, Orders without Requests that were Done become Delivered, and all the others become Not started. For each one you are still working on, choose Start work from its ⋯ menu.

    Requests and Orders in 4.0 →
  4. Zaps that use the Order status

    Zapier now receives the Order's Fulfillment (Not started, In progress, Delivered) instead of the old Order status (New, In Progress, Done). If a Zap filters or branches on the old values, change it to the new ones. The payment status "New" is now called Awaiting payment.

    What Fulfillment means →
  5. Where your clients find things

    Quotes and Invoices no longer have their own place in the client portal; clients find them inside Orders, next to what they bought. The page that lists your Services is called Front Desk. If you have told clients to look under "Invoicing" or "Services", let them know, or keep the names they know: in Settings › Portal › Sidebar content you can rename every item in the client sidebar.

    Everything that was renamed or moved →
  6. Anything that won't work in your setup

    Open each Service and Request type once. Flow preview flags anything missing as an issue, with a button that takes you to the fix, and the Setup column in Settings › Sales › Services shows at a glance which Services have something to fix.

    How Flow preview works →
  7. New notifications for clients

    Your notification settings stay exactly as they were. 4.0 adds four notifications a client can receive: New order placed, Payment received, Order canceled and Refund recorded. Find them in Settings › Workspace › Notifications on the Clients tab and switch on the ones you want.

    The new payment details →

If something looks different from what you expected, or something you relied on seems to be missing, message us from the chat in your workspace. We read every message.

Your plan

Your plan, your price and what your plan includes stay the same. New features follow the same tiers: theme presets and light and dark mode on every plan; your own names for Request types, like Projects or Tickets, from Core; full theme editing, Client themes and custom Dashboards on Pro and Agency. The full comparison is on the pricing page.

The full list of changes

Under the hood

  • Rebuilt from scratch. Zendo 4.0 is a new app on a new version of Vue.js. Every page opens faster and the app is much more stable, for your team and for your clients.
  • Zendo on your phone. The whole app is now a progressive web app (PWA): add it to the home screen and use it like a native app, with Menu, Notifications and Search at the bottom of the screen.
  • A new Settings screen. Settings open as a screen of their own, grouped into Workspace, Requests, Sales, Brand and Portal, with a live preview wherever you change how something looks.

Organize your work

  • Your work, under your own names. Call each kind of work what your business calls it, from projects and tickets to cases or listings, assign Request types to it, and Zendo uses that name across the app.
  • A tab for every kind of work. Add your own tabs to the sidebar, each showing only the Request types you choose, with its own unread counter and the view that suits it: a table for tickets, a board for projects.
  • Tabs for clients too. Give clients their own tabs, for example a Support tab next to their Requests.
  • Tabs only for the people who need them. Show a team tab only to chosen roles.
  • One board across several Request types. Kanban groups cards into Pending, Active and Completed, so different workflows line up on one board.
  • Statuses that mean the same thing everywhere. A Status is either pending, active or completed wherever it is used, and the Statuses list shows which Request types use it.
  • Control who can submit. For each Request type: everyone, only clients who bought a Service, or only your team.

Make the portal yours

  • 240 ready-made themes. 60 palettes, each as Solid, Gradient, Photo or Layered, previewed in light and dark, with your own photo if you want. On every plan.
  • Every detail of the look. Colors, background, sidebar, top bar, buttons and inputs, dialogs, contrast and font, for light and dark mode separately, or let Zendo generate dark mode from light.
  • A different look for every client. Give a client or a Client Team their own theme and change only what should differ; the rest follows your workspace theme.
  • Sign-up and login pages in your brand. Your logo, headings, backgrounds and an image beside the form, with Google and Facebook login hidden if you prefer.
  • Dashboards you arrange. Choose which cards clients and your team see, in what order, and what the New Request and Order service buttons say.
  • Onboardings you can prepare in advance. Save as a draft, publish when ready, and show it to all clients or only to chosen ones.
  • Emails in your brand. They carry your logo and accent color.
  • Colors that work in dark mode. Statuses and Request types can have a separate dark-mode color.

Sell and get paid

  • See what will happen before you send it. Flow preview walks through every step when you add a client, set up a Service, a Request type, a form or an Onboarding, or write a Quote or an Invoice, and points you to anything missing.
  • Orders linked to the work they pay for. Start a Request from an Order or link an existing one, and get paid from a Request with a Quote or an Invoice.
  • Know which paid Orders still need work. Fulfillment follows the linked Requests, and the Orders list has Ready to start, In progress, Delivered and Subscription tabs.
  • Cancel an Order cleanly. Zendo shows what was paid and what is still open, voids unpaid documents and can archive open Requests.
  • Record refunds. The client sees the refund on the document and in the email.
  • Bank transfers confirmed in one click. Clients report a transfer with I've paid, and your team confirms it.
  • Record a payment on any document, including ones set up for Stripe.
  • Four new client notifications. New order placed, Payment received, Order canceled and Refund recorded; switch on the ones you want.

Team and admin

  • Invitation links instead of codes. Name a link, choose how long it stays open and how many people can sign up, and revoke it any time.
  • Delivery logs. See who received each notification, who didn't, and why.
  • Everything easier to find. Navigation grouped under Sales and Library, settings grouped into Workspace, Requests, Sales, Brand and Portal. Old links redirect.

Works differently

  • Order status (New, In Progress, Done) is replaced by Fulfillment (Not started, In progress, Delivered), and Zapier receives Fulfillment. Payment status "New" is now Awaiting payment.
  • Clients find Quotes and Invoices inside Orders.
  • Storefront is now Front Desk, Impersonate is View as client and View as member, and Productized Services are One-off.
  • Old invite codes expire 30 days after they were created.

See you on Monday.

Kuba, founder of Zendo